To successfully document your insurance claim, you must capture high-quality, comprehensive images that verify the structural property damage and the full extent of your lost personal belongings. Most insurance companies require this detailed record of devastated areas to substantiate repair costs and ensure your storm loss is fully covered under your insurance policy.
In Summary
To ensure your property damage is fully covered, follow this quick checklist to document your loss and safeguard your recovery process:
- Prioritize Safety: Always wait for official clearance and assess structural integrity before you record any devastated areas or interior flooding.
- Capture Comprehensive Views: Take photos of each room from four angles using wide-angle views to provide context for the claim adjuster.
- Focus on Detail: Use high-quality, zoomed close-ups to verify specific damage to roof shingles, exterior walls, and broken windows.
- Catalogue Belongings: Photograph each personal belonging, including serial numbers, make and model labels, and any available receipts.
- Provide Evidence of Scale: Include a timestamp or dated document in your images and use a measuring device to illustrate the extent of the destruction.
- Mitigate and Archive: Make temporary repairs to protect the house from further damage, save all repair costs receipts, and back up your video footage to the cloud.
- Maintain Your Records: Organize your high-resolution images by location, keep damaged items until the insurer inspects them, and track all documentation submitted to the insurer.
- Legal Support: If your claim is denied or the reimbursed amount is insufficient, contact Kennon Law in Orlando for a professional review and help to validate your insurance policy coverage.
Quick Safety Guidance Before Taking Photos
Implementing quick safety guidance before taking photos is crucial to protect your well-being while you document the devastated areas. You should always wait for official clearance from local authorities or a professional inspector before attempting to record the damage inside a compromised building.
Property owners must assess the environment for hazards like downed power lines, gas leaks, or collapsing structural elements caused by interior flooding. We recommend wearing appropriate PPE, such as heavy-duty gloves and thick-soled boots, when navigating areas with broken windows or scattered debris. Safeguard yourself first; if a room appears unstable, do not enter to take photos. Instead, capture what you can from a safe distance to avoid further injury during the initial documentation phase.
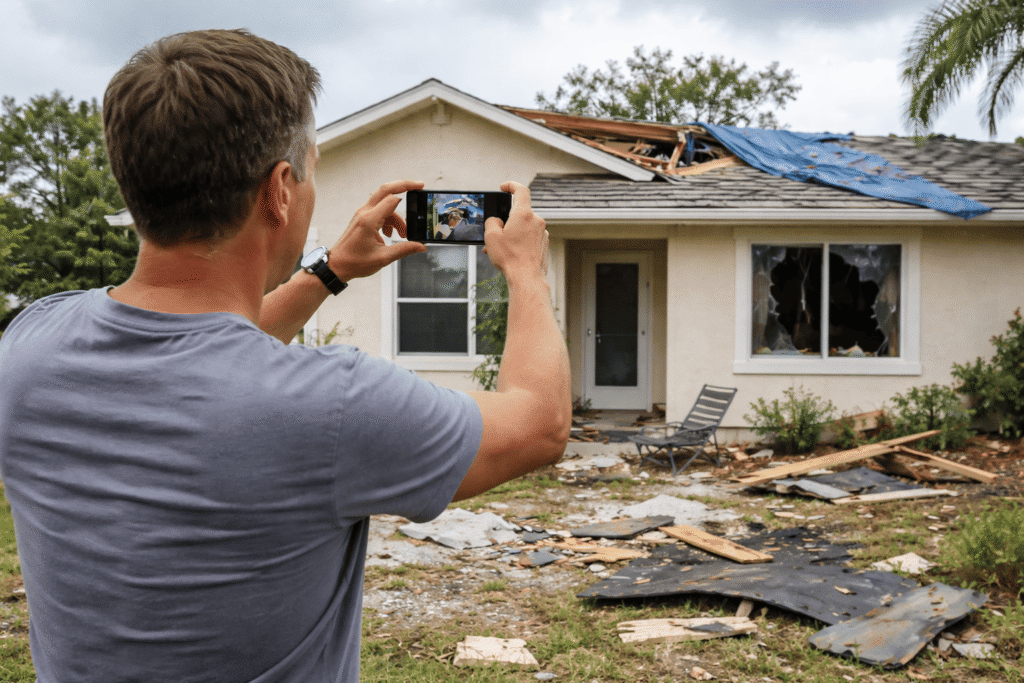
Start with Wide Shots to Show Property Damage
You should start with wide shots to show property damage by using panoramic and wide-angle views to establish the context of the loss for the claim adjuster. Capturing the entire room or the full exterior of the house allows the insurance company to see how different damaged items relate to one another.
- Corner Perspective: Take photos from each corner of the room to ensure 360-degree coverage of the interior.
- Street Level: Capture exterior perimeter shots from the street to show the property’s surroundings and overall devastation.
- Landscape Orientation: Use a horizontal phone position to fit more of the structural damage into a single frame, making it easier to compare with pre-loss images.
Document Each Wall, Floor, and Ceiling Individually
Documenting each wall, floor, and ceiling individually ensures you record every detail of the interior flooding and structural shifts. Systematic recording of these surfaces provides an undeniable record that the damage occurred during the storm, preventing delays in your insurance claim.
Use mid-range shots to show the location of the damage within the room, followed by close up photos of the specific damage. This method helps the insurer validate that the loss is a covered loss rather than pre-existing wear and tear. If storm surge has affected the flooring, capture the waterline clearly against the exterior walls to prove the depth of the water and the extent of the damaged materials.
Photograph Damaged Items
When you photograph damaged items, you must catalogue every personal belonging that was lost or damaged, ensuring you capture identifiable details like make and model labels. You must document each item in its original location to provide context for the adjuster during their review of the inventory list.
When you photograph these belongings, include high-resolution images of serial numbers and any available receipts or proof of purchase. Note the estimated value of each item in the photo captions to assist the insurance company in calculating repair costs or replacement value. This detailed documentation is essential to ensure your belongings are fully covered and you are paid fairly for your expenses.

Photograph From Multiple Angles
To effectively photograph from multiple angles, you should capture every instance of property damage from at least three distinct perspectives: a distance shot, a mid-range shot, and a zoomed close-up. Using multiple angles ensures that no detail is missed and the true extent of the devastation is clear to the insurer.
- Distance Shots: Show the damage in relation to the rest of the room or house.
- Zoomed Shots: Focus on the texture of the damage, such as roof shingles tearing or glass fractures.
- Video Footage: Record a brief video walkthrough of each room, panning slowly to capture a chronological layout of the damaged area.
Include Time References and Scale for Insurance Claim
You must include time references and scale for an insurance claim by using timestamped photos and measuring tools to provide objective, verifiable data for your file. Adding a dated document or using a digital timestamp verifies the exact date of loss and prevents delays regarding when the damage occurred.
Place a tape measure or a common object next to cracks or holes to illustrate the scale of the destruction. You can also use phone video footage and speak the date verbally while you record. These authentic details substantiate your claim and provide the corroborating evidence necessary for the adjuster to validate the expenses for repairs.
Prevent Further Damage Before Filing
To prevent further damage before filing, you should take immediate mitigation efforts, such as covering broken windows or tarping roof shingles, once the area is safe. While you must document the initial state first, most insurance policies require property owners to safeguard the house from worsening conditions.
Always photograph the temporary repairs you make and keep all receipts for materials or contractors. These expenses are often reimbursed as part of the claims process. By taking these next steps to protect your property, you demonstrate that you are acting to minimize the insurer’s loss, which helps maintain a strong foundation for your claim.
Taking photos is just one part of your responsibility after a disaster. Make sure you are following all necessary protocols with our guide to filing tornado insurance claims.
Organize and Submit Photos for Insurance Claims
You can organize and submit photos for insurance claims effectively by sorting your high-resolution images by room and damage type. This systematic approach allows the adjuster to review your documentation quickly, preventing delays and speeding up the recovery process.
Before you submit, remove duplicate images and ensure you keep the originals in their high-quality format. Upload the organized files to the insurer portal, adding descriptive captions that identify the date and location. It is also essential to back up all footage to cloud storage, ensuring you have a permanent record if the primary files are lost or the claim becomes complex.
Submitting organized files prevents adjuster confusion and speeds up your payout. Wondering what the wait looks like? Read our article about how long does a tornado insurance claim take.
Keep Damaged Items Until Instructed
You must keep damaged items until instructed otherwise by your claim adjuster to ensure they can verify the loss during their physical inspection. Discarding belongings too early can lead to delays or the denial of coverage, as the insurer may need to inspect the specific damage in person.
If you must discard an item due to safety concerns, photograph it thoroughly from multiple angles first and explain the reason for its removal in your inventory list. This keeps your documentation consistent and ensures you have the support needed to prove the item’s value and condition before it was removed from the house.
Photo Checklist for Tornado Insurance Claim
Utilizing a photo checklist for a tornado insurance claim helps property owners maintain a consistent and thorough record of every devastated area. This structured approach ensures that you capture all necessary evidence, from panoramic perimeter shots to specific serial numbers.
| Task | Action Required |
| Wide Shots | Capture four corners of every room. |
| Mid-Range | Show the location of the damage in the house. |
| Close-Ups | Photograph specific tears, cracks, or broken windows. |
| Details | Record serial numbers, make and model, and receipts. |
| Context | Use a measuring tape for scale and a timestamp for the date. |
Common Photo Mistakes That Delay Insurance Claim
Avoiding common photo mistakes that delay an insurance claim, such as blurry images or missing context, is vital for a smooth recovery. If the pictures are not clear, the insurance company may request a re-inspection, which significantly slows down the claims process.
Missing context is another frequent error; without wide-angle views, the adjuster cannot tell where the damage occurred in the house. Additionally, uploading unlabeled or disorganized files can lead to confusion. Always aim for high-quality, chronological documentation to keep the insurer informed and ensure you are paid promptly.
What to Do If Your Claim is Denied
If your insurance claim is denied or if the insurer offers an amount that fails to cover your actual repair costs, you need a strong legal advocate to safeguard your rights. Kennon Law specializes in helping Orlando property owners navigate the complexities of contested insurance policy disputes and structural integrity claims. Our experienced team of denied tornado insurance claim lawyers can perform a professional review of your case, utilize your recorded video footage and inventory list to substantiate the loss, and challenge the insurance company’s decision to ensure you are fully reimbursed.
FAQ
You should always take photos before making temporary repairs to capture the authentic state of the property damage. High-quality images of the initial devastation provide the corroborating evidence needed to prove the claim was caused by a covered loss before mitigation efforts altered the scene.
If your photos are blurry or low-quality, the insurance company may struggle to verify the specific damage, leading to potential delays. Most insurance companies require clear, high-resolution images to substantiate repair costs and ensure your claim is fully covered under your existing insurance policy.
You should take photos of each damaged room from at least four corners using wide-angle views to establish context. Complement these with close up photos of specific items to create a comprehensive record that the claim adjuster can use to validate the extent of the loss.
Photographing receipts for your personal belongings is an essential step to demonstrate the value of items lost in the storm. Clear images of receipts, combined with serial numbers and make and model details, help the insurer accurately calculate how much you should be reimbursed.